Stikkordarkiv: vRealize

Using RegEx to create custom DNS alert in vRealize Operations

I recently got a question on how to use regex within vRealize Operations to make a symptom if DNS server settings on a host is incorrect. I did a quick google search and found out that info on regex and vROps wasn’t easily available. So here is a litte write up on the process.

Create the Symptom

First we need to create a symptom
Go to Configure, Alerts, Symptom Definitions and choose ADD
In the Add Symptom Definition view change Base Object Type to Host System and Symptom Type to Properties. In Select Specific Object expand Configuration, Network and double click on DNS Server.

Give the Symptom a resonable Name and on the If Property choose Does not match regular expression. In the Property value field you should now see the value we need to match.
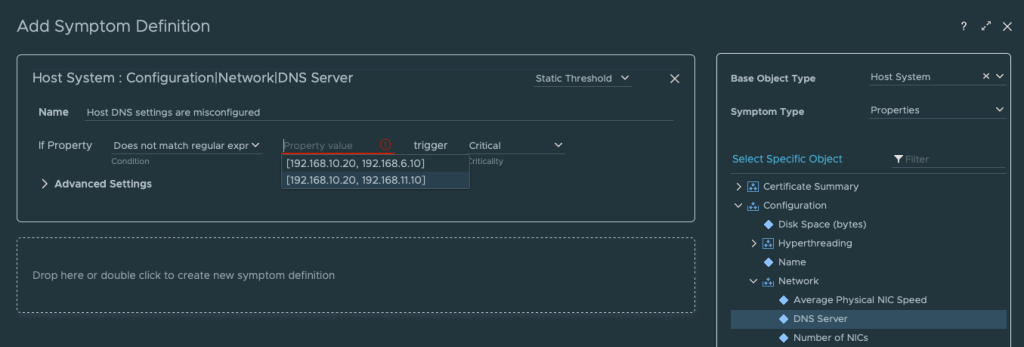
In my case the correct config is [192.168.10.20, 192.168.6.10] so I created a regex that will match on this value. There is probably other ways to create the regex but this worked for me. Regex example: \D192.168.10.20, 192.168.6.10\D

When that is done remember to set wanted Criticality and then save.

Create Alert Definitions

When that is done you can create your alert definitions and use the new symptom. (no step, by step guidance here)
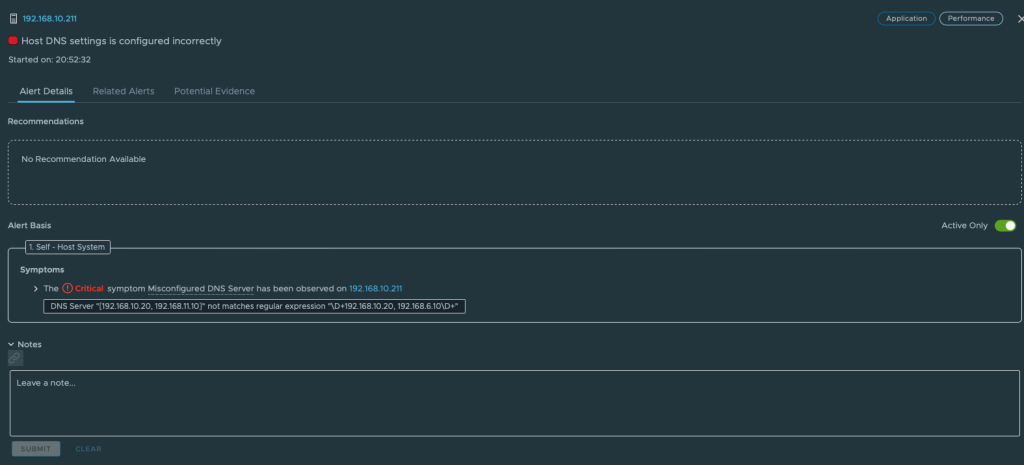
More advanced reqex

In my simple lab setup this regex was doing its job, but for a live production environment it might not be the case, what if some servers have the DNS configured in the opposite way? Then my regex won’t match.

That brings me to the customer use case brought to me by Bernt Christian Torbjørnsen, a vRealize Operations admin and virtualization evangelist. When combining my testing, some brainstorming and a screen sharing session with some trail and error we managed to tweak his regex to work within vROps and this is the code we ended up with.

RegEx: \D\b192.168.10.20\b.\b192.168.10.10\b\D|\D\b192.168.10.10\b.\b192.168.10.20\b\D

This regex will result in match if DNS servers is configure in any of thees to ways.
[192.168.10.20, 192.168.6.10] or [192.168.10.10, 192.168.6.20]

Hot Tip

If you want to test your expression quicker than waiting for vROps collection cycles, you can create a custom group instead and use your regex there to get instant preview.

In vRealize Operations it seems like we need to match the whole string including [ ] to get a match [192.168.10.20, 192.168.6.10]

Reference

https://regex101.com
Log Insight, Examples of Regular Expressions
How to enable true SSO for vRealize suite logins

If you have vRealize Suite license it is a good chance that you have deployed a vRealize Suite Lifecycle Manager and the included Identity Manager appliance. If not you probably should! You will have a nice portal for all your vRealize URLs with SSO, but you do not have true SSO all the way from your windows client to your vRealize applications. Users still have to login to the portal each time they want to use it. Here is a quick write up on how to enable kerberos authentication to achieve true SSO.

Attention
If you have vIDM 3.3.3 and 3.3.4 this feature is not working with the embedded connector. please upgrade to 3.3.5 where it is working again.

In this blog I will walk you through how to setup true SSO, but first to some prerequisites.

vIDM portal

Prerequisites

How to setup true-SSO in VMware Identity Manager

If all prerequisite are met we can start the setup. But before we can configure the adapter we need to join the appliance to the domain. Login to your Identity Manager with admin user and go to Identity & Access Management and then Setup

Under Available Actions click Join Domain and Insert username and password to join the domain. You can leave Organizational unit (OU) of domain to join blank or
If you want the machine placed directly in the correct OU, just add the details for your environment. Example: OU=Computers,OU=LAB,DC=lab,DC=vedaa,DC=net

When that is done we can continue and enable KerberosIdpAdapter
Make sure you still are at Identity & Access Management and Setup as before.
Under Worker click on your appliance FQDN and then Auth Adapters

Now click on KerberosIdpAdapter check the box Enable Windows Authentication and click Save. Close the current browser tab.

Go back to Identity & Access Management but this time stay on Manage and click on Policies. Select the default_access_policy_set and click edit

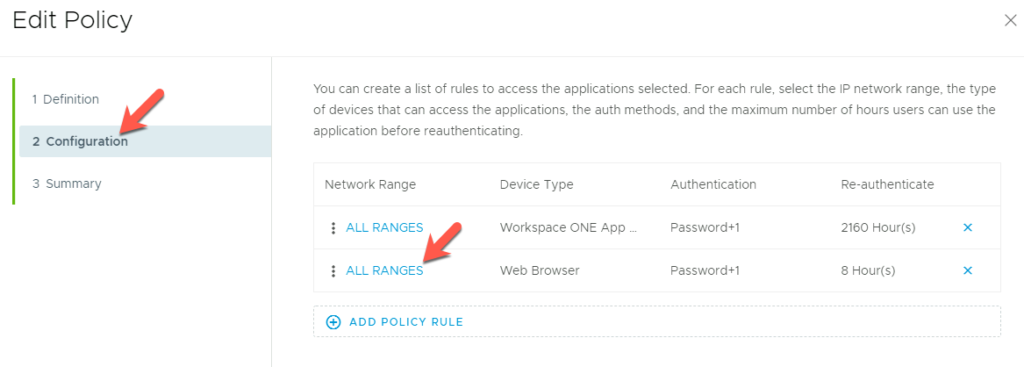
Click next og 2 Configuration and then click on All Ranges (Device Type Web Browser)

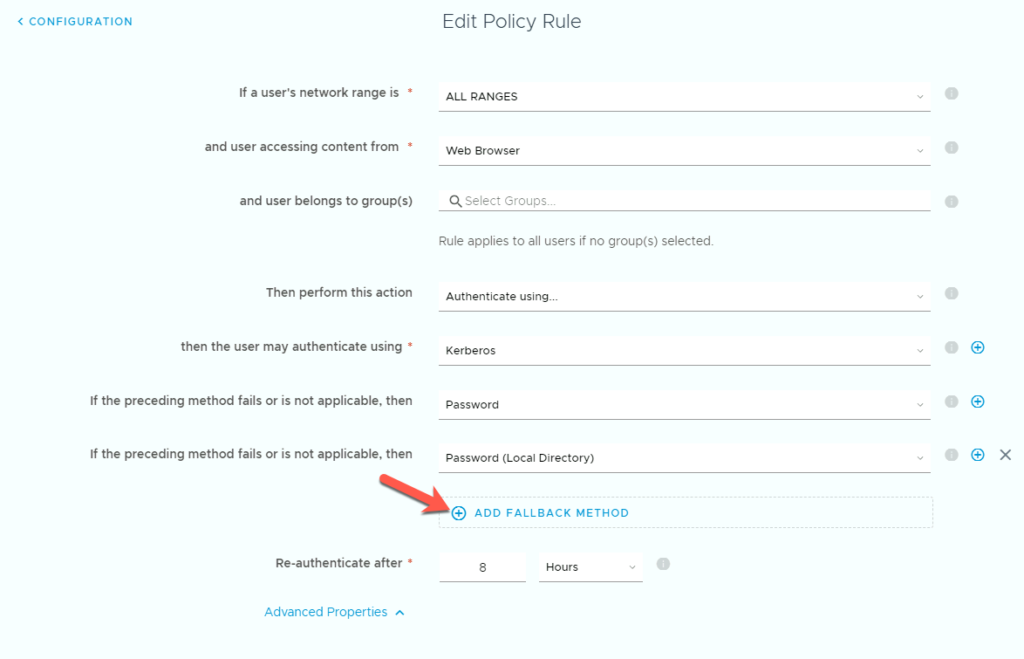
Edit the policy by first clicking ADD FALLBACK METHOD. Then change the order of the logins as shown below. First Kerberos then Password and last Password (Local Directory) then click Save, and then Next and Save.

True SSO should now be working form the VMware side of things. If it is not working take a look at thees additional steps.

Additional settings

Here is some additional steps you might need to perform if it is not working. First make sure that vIDM URL is part of local intranet zone. If it is not add it by following thees steps.

In Windows search for Internet Options
In Internet Options, click the Security tab.
On the Security page, select Local intranet.
Click Sites and add your vIDM URL to the list of websites.

It it is still not working verify that Integrated Windows Authentication is enabled.

In the Internet Options window, click the Advanced tab. In the Settings list, under Security, select Enable Integrated Windows Authentication.

Reference

https://docs.vmware.com/en/VMware-Workspace-ONE-Access/3.3/rn/VMware-Identity-Manager-335-Release-Notes.html

How to delete locker password entries in vRealize Suite Lifecycle Manager

Update 10.2020: In version 8.2 you can finally manage and delete passwords from the GUI

In vRealize Lifecycle Manager 8.0 VMware introduced «Locker» this is where you store certificates, licenses and passwords. If you for some reason add a password that is wrong or you want to delete an old one you are in trouble. There is no way to delete entries through GUI or CLI. But you can do it through the API!

Here is how

First you might need to install a software to do the API calls. I used Postman and you can download it here.

When you have installed or if you already have postman, you need to do the following

Authenticate

First you need to insert your credentials in the Authorization tab inside postman and send this POST command. Remember to insert your vRSLCM FQDN address.

POST 
https://vrslcm.your.fqdn/lcm/authzn/api/login

If login is successful you will get «Login Successfully» in return.

In versjon 8.0.1 of vrslcm and you also need to copy the Authorization Key Value found under Headers and Temporary Headers in postman.

Example: YWRtaW5AbG9jYWw6Vk13YXJlMTIzIQ
GET the list of all entries
GET 
https://vrslcm.your.fqdn/lcm/locker/api/passwords/

The GET command will give you a list of all the passwords and they’re vmid. Copy the vmid that you want to delete and use it instead of «vmid» below when you send DELETE command.

Update:
It appears that in version 8.0.1 this command is no longer possible.

Only for Pre 8.0.1 versions

DELETE the entries
DELETE http://vrslcm.your.fqdn:8080/lcm/locker/api/passwords/vmid

Run the GET command again to see that the password has been removed or refresh the locker page in the GUI of vRSLCM.

For 8.0.1 and possible later versions

Delete the entries

Login with root user to your vRSLCM appliance through SSH. and run the following command.
Remember to replace the IDs in bold with your own. First ID with the vmid from the GET passwords command. And the last ID with the Authorization KEY Value.

curl -X DELETE 'http://localhost:8080/lcm/locker/api/passwords/5581b687-a26c-4495-a8ed-11486c79fd81' -H 'Accept: application/json' -H 'Content-Type: application/json' -H 'Authorization: Basic YWRtaW5AbG9jYWw6Vk13YXJlMTIzIQ ' -k